Monday, April 21, 2014

Overactive Muse

I have seen several designers post about their Muses going on vacation!  Sometimes, I wish mine would!  It seems as though I have an overactive Muse!  I can't even finish one thing without having tons of inspirations as to how to do other things!  Because of this Muse Overactivity, I have many designs awaiting instruction writing.

Typically, I tend to leave these designs out on my worktable!  Thank goodness my table takes up a whole wall of my studio!  The designs were distracting me so unfortunately, I have had to start putting them away....but that leads to forgetting about them!  Somehow the designs need to stay foremost in my mind!!!


One thing that tends to figure greatly in this lack of timely instruction writing is also the short attention span of my interest in a specific design!  I have a tendency to figure out some design (Afterall, its all about solving problems!), and then moving on to the next idea!!  I am always seeking something new and exciting!  I wonder what psychologists would say about that?!


Another thing that impairs my ability to be timely in writing instructions is my short short term memory!  If I don't write/draw a design idea when it hits me, I forget about it!  Therefore, I have lots of notes that I have to save for later to try out ideas!  There just simply is not enough time to do it all!!!


In trying to figure out how to deal with this issue, I have posed the question of having someone else write instructions for me!  But then I think of the time involved in having to explain how I would like the instructions written and how to actually bead the design, not to mention the cost of hiring someone who would actually want to do something like this!


I wish my Muse would be interested in a vacation for a week or two so I could get more instructions written!!  I hope you have enjoyed looking at my newer designs awaiting my time to write the instructions!!!
Happy beading!!

Tuesday, February 25, 2014

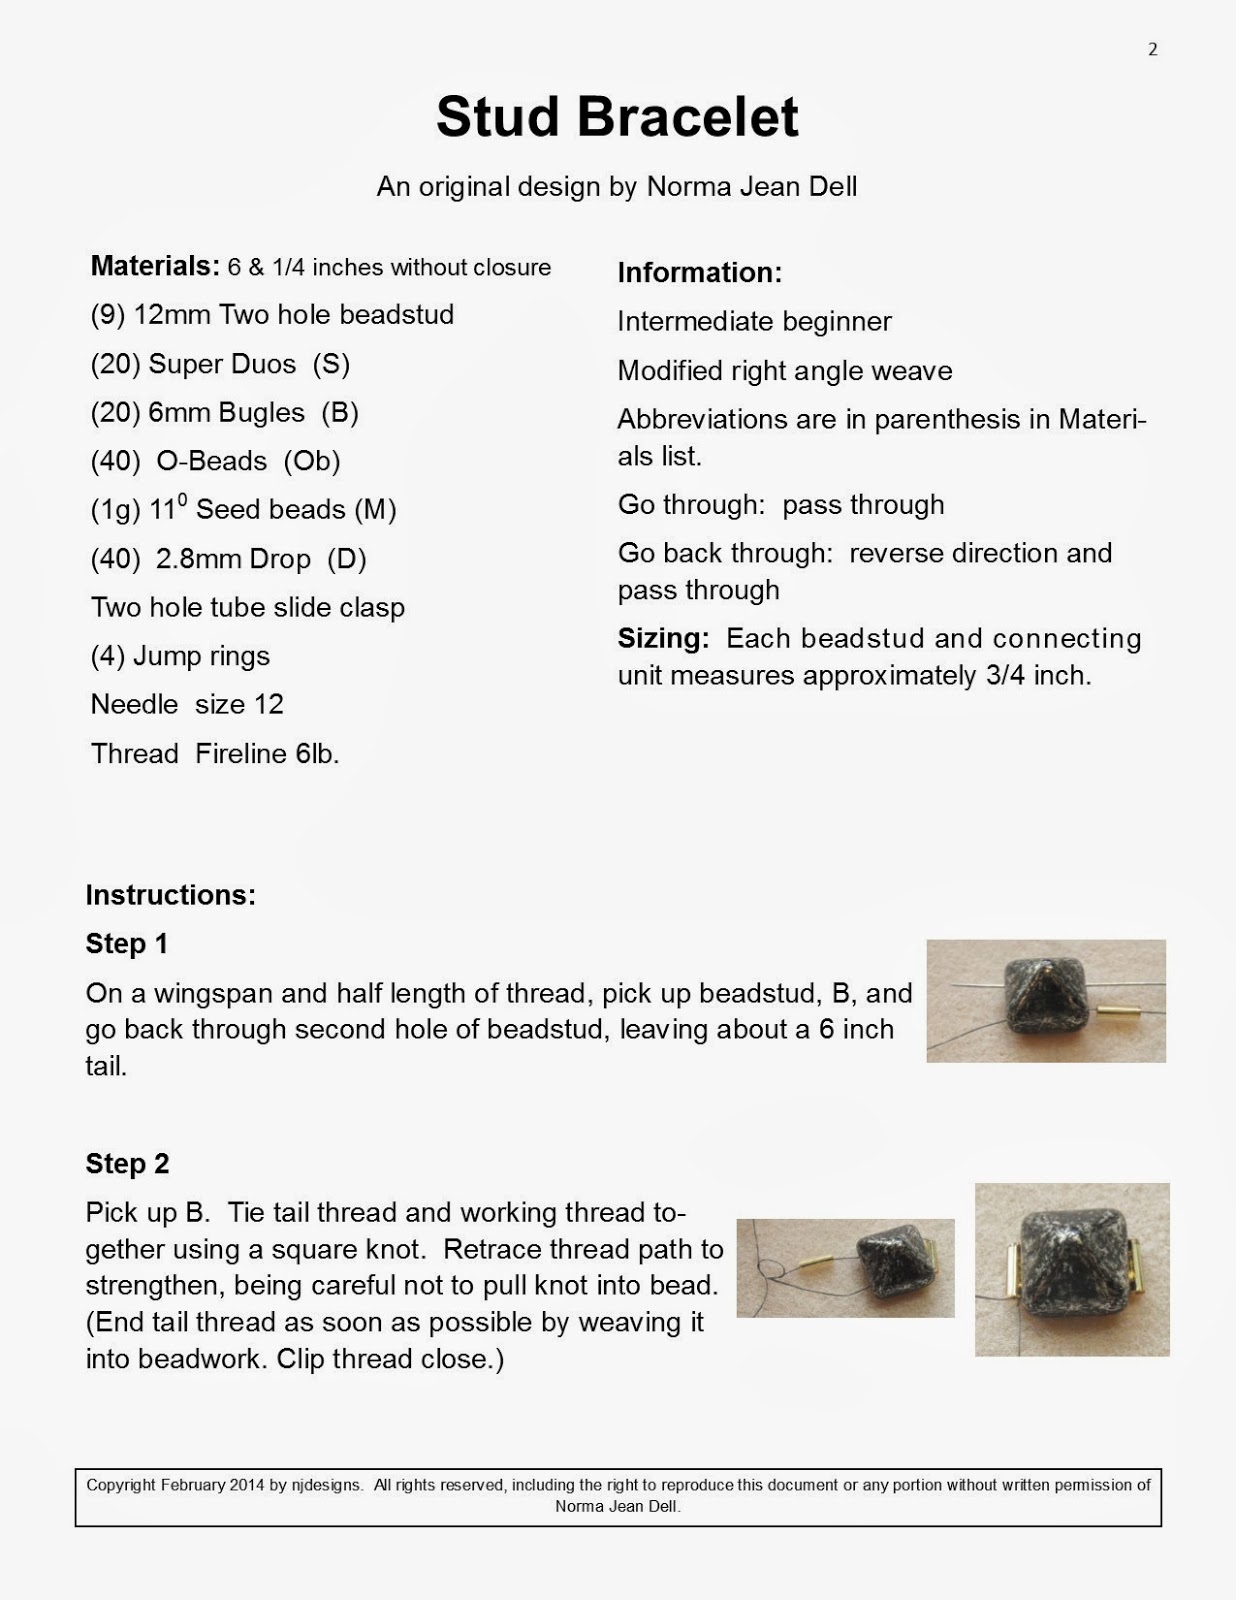
Stud Bracelet


I love this bracelet!  It takes around an hour to make so you can wear it the day you make it!!  Below the photos you will find jpegs that show the complete directions on how to make your own Stud Bracelet!  Please enjoy and give me the design credit when you share your own version!!!  Thank you all for supporting me!  Happy beading!!


Thursday, February 20, 2014

A Little Bit of Organization Goes a Long Way

A little bit of organization goes a long way!  I have a large table area for beading which frequently (everyday) looks like this:


The above photo shows where I sit to actually bead.  I have my music there and all the other beading items at hand.  Moving slightly to the left is this area.


I use it to stack the pieces I am currently working on.  I get bored, frustrated, or loose sight of a design so I just box it up and set the beading mats here for later use, hoping inspiration comes quickly.  You will also notice that I use a lot of late post it notes for lists, design, or just notes on what I am working on.

Moving further to the left is this area:


Here I have more storage for projects that I need more time to figure out what to do with.  Some I even leave on my paper mat just so I can see them and keep them currently in my memory! 

Now for the important part...Can you see the plastic containers in the photo above?  They are my organization idea that I wanted to show you.  There is a larger one to the top right of photo.   Inside it  are several more smaller ones.


 Here is a close up of the larger container with the smaller ones inside.  These containers are made to hold and organize photos.  You can get them in the size as above that contain 6 smaller boxes or a larger size that contain many more.  I do have some of the larger ones but I do not keep them out on my beading table.


Here is a photo of one of the individual photo containers opened.  I like this storage solution because my post it note paper fits nicely inside the box along with the sample project.  The bead containers I use fit inside as well.  They can also be stacked with your bead mat so that nothing gets lost.  All the materials needed are right there.


These containers can be purchased at just about any hobby/craft store!  I can't remember how much they cost because I have had them for so long and reuse them all the time!

Happy beading!!

Stay tuned...I am working on a freebie beading pattern to be posted here!  


Wednesday, December 4, 2013

Christmas Fever

I'm in full beading mode.....doing Christmas ornaments when I should be working on things that I have started.  They need to get finished up before....I don't know...year's end!!

 Maybe those Elves, who work hard to create toys for Santa to deliver, will show up and complete these.....

I have a bracelet and two earring designs that I need to write instructions for.  The bracelet would match my Sunrise Pagoda Necklace....


Here are one set of earring designs.  I used peanuts and seed beads for the tops!


These earrings I made for me to wear for the holidays.  The one on the left was my first try...I made the second one and decided it was a keeper. And of course I love them and must write up instructions.....


This is a bottom portion of a new pendant design.  I stopped work on it when I started the top and rope section.  I didn't like what I came up with, so now I have to redo the top section and rope...Muse, where are you???


I designed this as a bracelet!  It is gorgeous, but doesn't work as a bracelet....I have to figure out what I am going to do with it....


 I love these stars...they are so easy to make and look so sparkley!  But I don't know what to make of them...


All I want for Christmas is a visit from those work crazed elves to finish up my work for me!!!!!
Oh well, I'm off to finish up another Christmas Ornament!!!
Happy beading!!

Thursday, November 7, 2013

Playing with Baubles

First I would like to say that I love the word, "baubles".  Baubles, baubles, baubles!!

I have been playing around with beads lately making these small pendant like things that I call baubles.  I am trying to figure out what to do with them.  I thought that they would make small pendants, but I'm not too keen on that idea.  Small Christmas ornaments?  Nah!  What I probably need to do is put several together to form a nice necklace or bracelet....I just can't figure out how right now!!!  Do any of you have any ideas?  Please let me know!  Also, how about tutorials for just baubles?  Would anyone be interested in those?  Again, please let me know your ideas!!


Monday, October 28, 2013

Taking Photos of Jewelry

I am not a photographer!  With that said, I feel that I do take good photos of my jewelry and some of you out there in the internet world must agree somewhat.  I have had several people ask about my camera and how I photograph my jewelry.  I am writing this post to answer those questions.

The camera I use is an Olympus Stylus-90000.  It is at least 5 years old.  It is a point and shoot type camera, but with some changable functions.


I do use a light box that I purchased.  Here are some photos of it.  Keep in mind that I keep it in a storage closet!


Notice that in the photos there is a tripod for my camera.  I tend to shake and move the camera about when I take photos without my tripod!  I don't think that the brand of light box nor lights make that much of a difference.  I feel that one must use the settings on the camera to take better photos.

The settings I use on my camera are WB (white balance), macro, and +/-.  I set my WB to the sun symbol for bright light.  I use the macro "on" setting (flower symbol)...sometimes I even use the super macro setting.  These help, but I have found that the +/- (I think its called the aperature.) is the most imortant.  On my camera I can display a bar graph of the lighting and I know to keep the red next to the right side of the graph.  I take several photos at the +/- on 0.0 then move up to +0.3, +0.7, and/or +1.0.  I download the photos to my computer and choose the best looking one as the one I save.  If I happen to use a black background, I tend to move the +/- into the negative numbers and do the same thing.

I know that a lot of people use a photo editing program on the computer to enhance their photos.  I saved my Microsoft Office Picture Manager from 2003 and still use it if I need to crop or brighten.  I like that I can change the light, medium, and dark areas with this program.  Plus it is easy to use!

These are the things I do to take photos of my jewelry.  I hope it will help some others out there!  Remember I am not a photographer and all my learnings have occurred from trial and error!  And a lot of errors!!!